Say Cheese –

say-cheeseWelcome to the first post in a series on cheese making, a topic much simpler than you might think. It’s the process of heating milk to the point that curds (the delicious fat solids) separate from the whey (the watery by-product). And I’m not talking about the curds couch-surfing at a mate’s place while the whey rips up all their old photos and changes the locks, I’m talking about bacteria, enzymes and acids. Using this process you can essentially make most other forms of cheese and I’ll cover this soon.

scooping the curds
What will I need to make cheese?
Some cheese requires specific equipment and we will cover this when the time comes, but for now let’s keep it simple, the basics you will need are:
  • Large pot (We use a 10 lt solid base pot)
  • Colander and/or cheese cloth (Cheese cloth is cheap and can be purchased in bulk from a sewing store)
  • Ladle or stirring spoon
.
Unless you have a cow, goat or other lactating animal that you’re prepared to harvest, it’s fine to use store bought milk. Yes, you can buy unpasteurized (Bath milk) but it’s whey too expensive. (That was my little joke). I have tried different brands of supermarket milk and there isn’t much of a difference, I personally use A2.
Whole Milk Ricotta is probably the easiest and it’s made from things you probably already have in your kitchen, here are the steps:
  • tempAdd 3 1/2 litres milk to a large pot on a medium heat.
  • Dissolve one teaspoon of citric acid in 50ml of water and add to milk with half a teaspoon of salt. Mix the milk thoroughly, you want to heat the milk but not boil it.
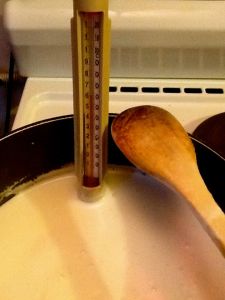
  • Stir often to prevent scorching.
  • Heat the milk to 85-90°C and as soon as the curds and whey separate turn off the heat and let it sit  undisturbed for 10 minutes.
  • Scoop the curds out and drain through a colander or cheese cloth.
  • The cheese is ready to eat immediately.
  • For a creamier consistency, add 1/2 cup of cream at the end and mix.

You can store in a covered container in the fridge for 1-2 weeks. I really do love cheese, even if it doesn’t always love me back. Try it in ravioli using our pasta recipe for dinner, even on toast for breakfast with a little chilli and avocado. What a way to start the day!

Everything You See I Owe To Spaghetti

pasta crop

One of the many benefits of having chickens is fresh eggs and there’s no shortage of uses, but one of Sophia Loren and our favourites is fresh pasta. For each person your going to need about one hundred grams of fine flour, we use the same flour I bake with (The aptly named – Bakers’ flour), you can substitute with plain flour but your pasta will be a little heavier. You will also need one free range egg. For each additional person add another hundred grams of flour and an additional egg. Here I have covered two methods, one is beautiful and authentic, the other is much quicker but more realistic,  you should definitely try both.

Option one

Lightly sprinkle the pasta length with flour and fold loosely in half, repeat and repeat taking care to keep it loose until you have a roll you can easily handle. Then with a sharp knife cut across the roll creating whatever pasta width you like, skinny for spaghetti, fatter for fettuccine, my personal favourite is a mix.

DSC_0052Pour a glass of red wine and consume; you need to get your head in the right place for this. Now sift one hundred grams of flour on your bench and make a well in the middle then add an egg into the well. With one finger or a fork start mixing in the flour, a small amount at first then continuing with your whole hand. You are looking for a light doughy consistency that’s almost sticky. If time permits, rest this dough in the fridge for an hour.

Option two

Add one hundred grams of flour and one egg to your food processor and pulse until the mix forms small grains. Test the consistency and add a small amount of water or flour if required.

Then

DSC_0584DSC_0063

Sprinkle some flour on your bench and divide your dough into halves. If you have a pasta roller then great, if not then pour another glass of wine. You could easily use a rolling pin but somehow the wine bottle feels more involved. Using the wine bottle roll your dough into long lasagne sheets adding an extra sprinkling of flour if it starts to stick. continue until your pasta is no more than one millimetre thick.

DSC_0064

DSC_0076


DSC_0087Half fill a large pot with water and add a good pinch a salt. Bring to the boil, but DON’T add any oil, many people do this and it’s a big no-no. The oil clings to your pasta and prevents your sauce and her beautiful flavour from coating and infusing its delicious flavours. Once the water has come to the boil add your pasta and stir occasionally until cooked, this takes less than five minutes so be on your guard.


Test your pasta, and once you’re happy it’s cooked, strain it and let drain for about thirty seconds, then after it’s dry pop back in the pot with a ladle full of your desired sauce and combine, serve (or pop the lid back on until you’re ready).

bon appétite.

DSC_0102